
You know me - I loves an easy project.


What makes this a Very Lazy Blanket are two vital components:

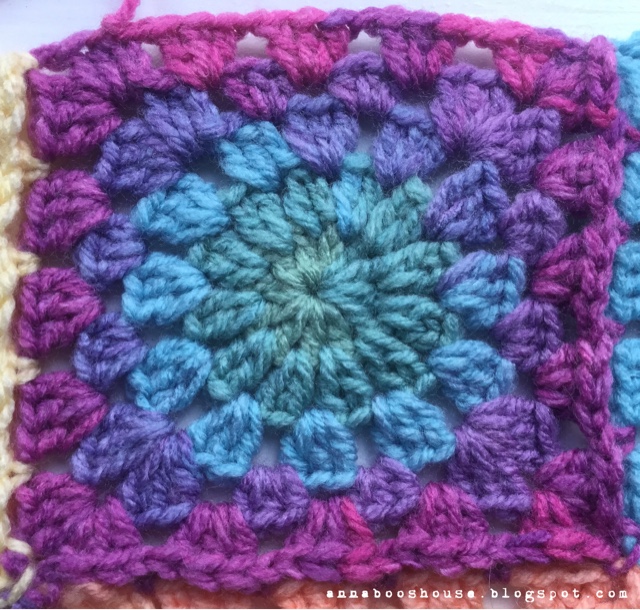
The yarn I found is this very lovely stuff from Ice Yarns. It's called Magic Light and is acrylic DK/ Worsted weight in 100g balls. It's soft to the touch and works up very nicely indeed. I found it cheapest to buy direct from the manufacturer in Turkey and ordered 12 balls, so that I've got plenty. I've found that you can make around 18 squares with one ball, with each motif measuring 10cms (4 inches) square.

I wanted something colourful that I could work on without having to faff around with lots of balls of yarn and weaving in lots of ends. (And don't get me wrong - I have one of those projects in my WIP pile, but I just yearned for something a bit more portable.)
And so, may I present the Very Lazy Blanket....
...er, well it's more like a Very Lazy table-runner at the moment, but it has every intention of becoming a blanket one day. My original plan was to finish it, do a big 'tadaaah' post and then share the pattern, but I just haven't managed it... And as lots of you have been asking for the pattern, I just couldn't wait any longer.
What makes this a Very Lazy Blanket are two vital components:
1. Self-striping yarn
The yarn I found is this very lovely stuff from Ice Yarns. It's called Magic Light and is acrylic DK/ Worsted weight in 100g balls. It's soft to the touch and works up very nicely indeed. I found it cheapest to buy direct from the manufacturer in Turkey and ordered 12 balls, so that I've got plenty. I've found that you can make around 18 squares with one ball, with each motif measuring 10cms (4 inches) square.
2. Join as you go method.
I have a handy YouTube tutorial to show you how- just click on the YouTube tab at the top of the page and you'll find it.
The Very Lazy Blanket Pattern (UK terms) - U.S. Below
Stitches used
Chain = ch
Slip stitch = sl st
Treble crochet = tr
Half Treble Crochet = htr
Ice Yarn Magic Light in Green, Pink, Blue, Purple, Yellow
4.5 mm hook
Ch4, join with a sl st to make a ring.
Round 1: Ch3 (counts as tr here and throughout), 11tr in ring. Join with sl st to top of ch-3.
Round 2: Ch3, 1tr in same space, ch1, (2tr, ch1 between each of the trebles from Rnd 1). Join with sl st to top of ch-3.
Round 3: Ch3, 2tr in same space, ch1, (3tr, ch1 in each ch1-space). Join with sl st to top of ch-3.
Round 4: Ch3, 2tr, ch2, 3tr in same space, ch1, (3htr, ch1 in next ch1-space twice), *(3tr, ch2, 3tr in next ch1-space), ch1, (3htr, ch1 in next ch1-space twice)* repeat from * to * three times. Join with sl st to top of ch-3. Sl st across into ch2-space.
Round 5: Join as you go (see YouTube tutorial above) Or -
Ch3, 2tr, ch2, 3tr in same space, ch1, (3tr, ch1 in next ch1-space 3 times), *(3tr, ch2, 3tr in next ch1-space), ch1, (3tr, ch1 in next ch1-space 3 times) * repeat from * to * 3 times. Join with sl st to top of ch-3.
The Very Lazy Blanket Pattern (US terms)
Stitches used:
Chain = ch
Slip stitch = sl st
Double crochet = dc
Half Double Crochet = hdc
Ice Yarn Magic Light in Green, Pink, Blue, Purple, Yellow
4.5 mm hook
Ch4, join with a sl st to make a ring.
Round 1: Ch3 (counts as dc here and throughout), 11dc in ring. Join with sl st to top of ch-3.
Round 2: Ch3, 1dc in same space, ch1, (2dc, ch1 between each of the doubles from Rnd 1). Join with sl st to top of ch-3.
Round 3: Ch3, 2dc in same space, ch1, (3dc, ch1 in each ch1-space). Join with sl st to top of ch-3.
Round 4: Ch3, 2dc, ch2, 3dc in same space, ch1, (3hdc, ch1 in next ch1-space twice), *(3dc, ch2, 3dc in next ch1-space), ch1, (3hdc, ch1 in next ch1-space twice)* repeat from * to * three times. Join with sl st to top of ch-3. Sl st across into ch2-space.
Round 5: Join as you go (see YouTube tutorial above) Or -
Ch3, 2dc, ch2, 3dc in same space, ch1, (3dc, ch1 in next ch1-space 3 times), *(3dc, ch2, 3dc in next ch1-space), ch1, (3dc, ch1 in next ch1-space 3 times) * repeat from * to * 3 times. Join with sl st to top of ch-3.
I hope you enjoy the pattern. And I'd love to see your completed blankets, too.
Have a great week,
Sarah x


